
ReplyCX logoReplyCX

Updates

New updates and improvements to ReplyCX.

Automation Logs give you visibility into what happens each time your automations run.

Using Automation Logs, you can:

• See when an automation was executed

• View the trigger conditions that caused it to run

• Check the action performed and its status (success or failure)

• Open individual logs to view detailed execution information

This makes it easy to monitor your automations, understand how they're executing, and troubleshoot any issues quickly. How to access Automation Logs

  1. Go to Settings Automation

  2. Select the automation you want to review

  3. Click Logs

image.png

Viewing detailed execution information
Click on any log entry from the list to open its detailed execution information. Each entry shows the action taken, its status, and the date/time it was executed.
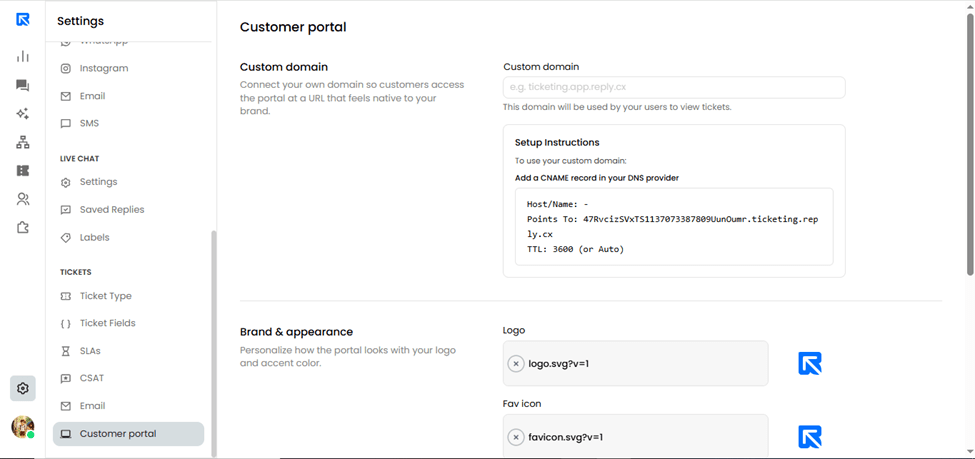
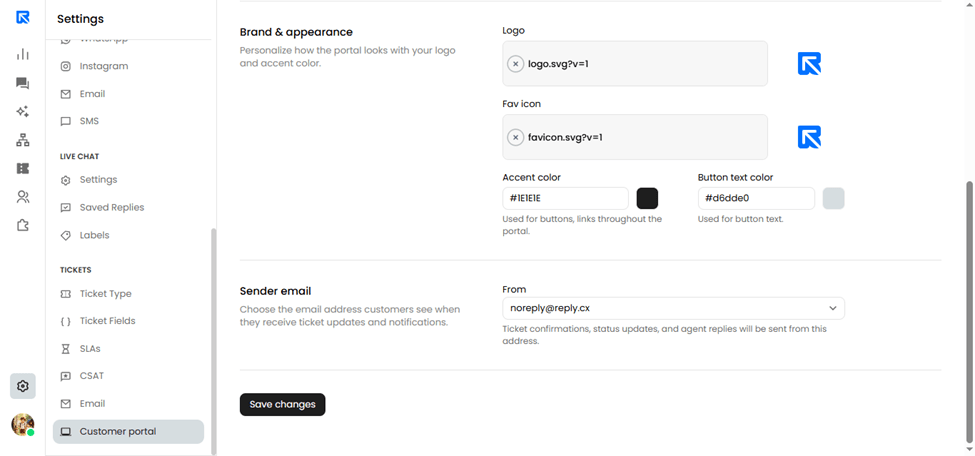
image.png

Comments·0

The new Chat Info section is now available in Live Chat, making it easier to manage important conversation details from a single place.

What's New?

  • Add Conversation Details:

    Agents can add important information to a conversation by selecting a Conversation Variable from the Add Info dropdown and entering its value.

  • View All Chat Information:

    Once added, conversation details such as Urgency, Use Case, Chat Volume, Meeting Date & Time, Summary, and other conversation variables are displayed in the Chat Info panel.

  • Edit Information Anytime:

    Conversation details can be updated directly from the Chat Info panel whenever needed.

Benefits   

  • Keep all important conversation details organized.

  • Quickly access key information without searching through the chat.

  • Capture and update conversation data in one place for better tracking and follow-ups.

Where to Find It

Live Chat → Select a Conversation → Chat Info (Right Side Panel)

image.png

Use the Add Info option to select a conversation variable from the dropdown and store important details for each conversation.

Comments·0

We're excited to introduce Role-Based Chat Visibility in ReplyCX!

You can now configure Chat Visibility at the Role level instead of the Account level, giving you greater flexibility and control over who can access live chat conversations.

What's New?

  • Configure chat visibility for each role independently.

  • Set different permissions for Agents, Supervisors, Managers, and other custom roles.

  • Improve data privacy by ensuring users only see the chats relevant to their role.

  • Simplify access management without affecting the entire account.

Where to find it:

Settings → Teammates → Roles → Edit → Live Chat

image.png

Comments·0

ReplyCX introduces Single Select Variables, making data collection more structured, accurate, and user-friendly.

What's New?

  • New Single Select Variable Type: Create variables with a predefined list of options for both Contact and Conversation variable types.

  • Automatic Dropdowns in Forms: When a Single Select variable is used in a Form block, visitors are presented with a drop-down menu containing your configured options - eliminating free-text input and ensuring consistent responses.

image.png

Why You'll Love It

  • Improve data consistency across conversations.

  • Reduce manual input errors and spelling variations.

  • Standardize customer responses with predefined choices.

  • Create cleaner and more reliable data for reporting and automation.

Good to Know

The Single Select variable type is supported everywhere Regex Variables are available, with the exception of:

  • Google Calendar block

  • AI Agent Exit Path

Where to Find It

Settings → Variables → Create Variable → Type → Single Select

image.png

Start using Single Select Variables today to capture cleaner, more consistent data across your workflows!

Examples:

Subscription Plan

Options:

1) Basic

2) Standard

3) Professional

4) Enterprise

Comments·0

We have introduced a new Customer Portal feature, enabling us to provide a fully branded, self-service experience for customers to view and manage their support tickets.

Users can now configure a custom domain, allowing the portal to be accessed via their own branded URL instead of a default system link. This helps improve trust and creates a more seamless customer experience.

We have also added branding and appearance customization, where users can upload their logo and favicon, set accent colors, and adjust button text colors to match their brand identity.

Additionally, users can now select a sender email address for all portal-related notifications. This ensures that ticket updates, replies, and alerts are sent from a consistent and verified email identity.

These enhancements help us deliver a more professional support experience while maintaining brand consistency across both the portal and communication channels.

Comments·0